Do you want to make your bike smarter and more comfortable? If so, you might want to install and use a linear actuator for your smart bike. When you use a linear actuator in your bike, it will provide hassle-free customization at your fingertips!
There are different types of linear actuators, but we recommend that you use electric ones because they run on either batteries or external sources and also grant full control simply through switches/remotes.
In today’s post, we show you how to install and use a linear actuator for your smart bike in five easy steps.
Steps to Install a linear actuator in a Smart Bike
You will need the following tools and materials:
- A suitable linear actuator for your bike
- Brackets or clamps to mount the actuator on your bike frame
- Connectors and cables to wire the actuator to the power source and the controller
- A switch or a remote to control the actuator
- A multimeter and a potentiometer to test and adjust the actuator settings
- A smartphone or tablet to connect to your smart bike via Bluetooth or Wi-Fi (optional)
With that out of the way, you will need the following steps to install and use a linear actuator for your smart bike:
Step 1: Choosing a Suitable Linear Actuator for Your Bike
The first step is to choose a linear actuator that works well with your bike. Of course, every bike has specific requirements, so you need to select a suitable linear actuator with the right size, stroke length, speed capacities, and force intensity levels.
There may be multiple options available through online shops that’ll be appropriate for use in smart bikes, and you can find them here.
Step 2: Mounting the Linear Actuator on Your Bike Frame

Once you have chosen the appropriate linear actuator, it’s time to mount it on your bike frame using brackets or clamps. Find a secure and stable position for the actuator so that it won’t interfere with other bike components or compromise comfort.
Here are some tips to keep in mind to guide you through the process:
- Align the actuator with the part you want to adjust, such as the seat post or handlebar stem.
- Use brackets or clamps that match the diameter of the actuator and the bike frame to ensure a proper fit.
- Firmly tighten the screws or bolts, but be cautious not to overtighten them as this could damage the actuator or the frame.
- Allow some space for the cables and connectors associated with the linear actuator.
If you need more specific instructions, consult the user manual or seek guidance from the linear actuator manufacturer.
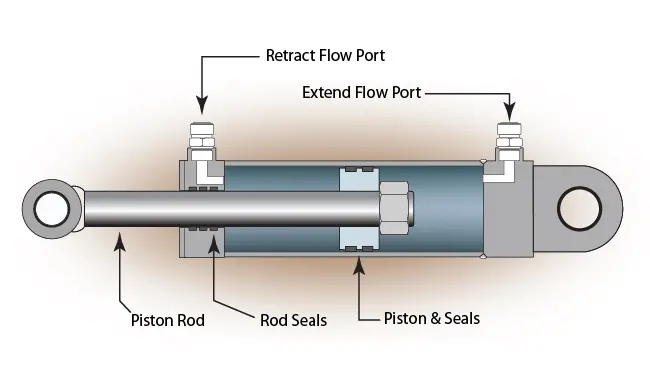
Step 3: Connect the Linear Actuator to the Power Source and the Controller
Connect the linear actuator to the power source and the controller. Next, wire the actuator to the battery or the power supply using appropriate connectors and cables. You will also need to connect the actuator to the switch or the remote that will allow you to control its movement.
You can follow the instructions provided by the manufacturer of your linear actuator for wiring and connecting it, but generally:
- Use connectors and cables that match the voltage and current rating of your actuator
- Follow the color coding or labeling of the wires
- Secure the connections with electrical tape or heat shrink tubing
- Place the battery or power supply in a safe and accessible location
- Place the switch or remote in an ergonomic and convenient location
Step 4: Test and Adjust the Linear Actuator Settings

It’s time to check if your new fixture is working correctly. Testing linear actuator settings will ensure that your bike is performing at its peak.
You can use a multimeter to check current/voltage measurements. Next, set force/speed levels through potentiometer/controller modifications. Below are just some useful tips that could aid in this process:
- Turn on the power source and test the switch or remote
- Observe how fast and far the actuator moves
- Check if there is any noise or friction
- Adjust the potentiometer or controller until you get the desired speed and force
- Check if there are any safety features such as limit switches or overload protection
Step 5: Enjoy Your Smart Bike with a Linear Actuator
The fifth step is to enjoy your smart bike newly fitted with a linear actuator. You can now use the switch or remote to activate it.
Where Can Linear Actuators Be Used in Electric Bikes?

Linear actuators are highly versatile devices that have found numerous applications in the world of electric bikes. In electric bikes, they can enhance functionality, granting you a more user-friendly ride. They can be used to:
Enhance Bike Stability
One area where linear actuators contribute best is by enhancing bike stability. When you use a linear actuator to support your bike’s suspension, it offers smooth rides by adapting precisely to different types of terrains.
It also takes into account tastes, making sure that you are as safe as possible and providing the most comfortable, enjoyable rides possible in their settings. The automatic adjustments that these devices make based on the road make the smart bike work better and improve its total performance.
Bike Rack Lock

Linear actuators are also used to make bike rack locks easier, which makes the process simpler to move electric bikes. With the help of linear actuators, you’ll be able to transport on vehicles using bike racks, which you can easily lock and open.
This feature not only makes it easier to keep the bike safe while transporting it, but it also makes theft or damage less likely. Some bike racks have one-touch or remote-controlled locking systems that are made possible by linear actuators. This makes putting and taking out bikes quick and easy.
These applications are just a few examples of where you can use linear actuators in smart bikes. There are numerous other potential applications that we have not even covered here, so there’s a chance you’ll find other exciting use for this versatile device.
Conclusion
Imagine gliding effortlessly over rough terrains while your bike adapts to every bump and dip. It’s like having a personal suspension guru right at your fingertips!
And here’s a fascinating fact: linear actuators can be integrated with smart technology, allowing you to control your bike’s movements with a simple push of a button. It’s the perfect fusion of cutting-edge innovation and the joy of riding.
Ready to take your electric bike to the next level? Harness the incredible potential of linear actuators today, whether you’re seeking enhanced stability, convenient bike rack locks, or customizable features.