Knowing how to paint chrome bumpers for best results is an excellent skill you need to possess if you care so much about your vehicle’s aesthetic value and appearance.
A chrome bumper may need to be painted when it is affected by rust or your desire to improve its appearance. This involves painting this part of the vehicle with a color of your choice.
Usually, painting a chrome bumper is effortless. However, there are essential factors you need to consider.
As you read along, you will find out about these factors and why you need to pay attention to them before you paint your chrome bumper.
This article also discusses the necessary steps you need to take to achieve a successful painting project.
Why People are Painting Their Chrome Bumpers
People paint chrome bumpers for various reasons. We can admit that everyone has a specific reason for applying paint on this part of the vehicle.
For instance, some people paint the chrome bumper to prevent rust.
It may enhance the vehicle’s appearance (to achieve uniformity) for others, especially when the chrome bumper is painted differently from the vehicle’s body.
Things to Consider Before Painting Chrome Bumpers
You do not just pick a spray gun and start painting the chrome bumper. Below are some factors/things you need to consider for best outcomes.
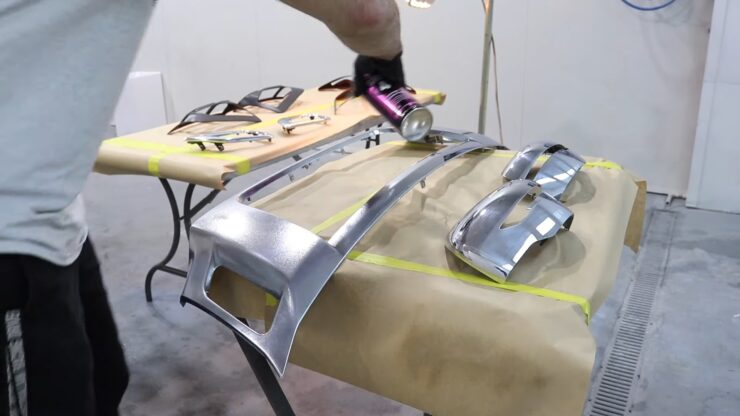
- Ensure the bumper is free from dirt or particles (you can wash the surface with soap and water).
- Take off existing paint from the bumper. A paint stripper does the job well.
- Peel off/eliminate any sign of rust using sandpaper
- Apply primers to the surface of the chrome bumpers
Once all of these steps have been taken, you can apply paint on the chrome bumpers accordingly. The reason for these precautions is to avoid ending up with cracking paint in a short period.
DIY Guide for How to Paint Chrome Bumpers
Material needed to paint chrome bumpers
- Paint the color of your choice
- Sandpaper
- Clean rag or duster
- Soap and water
- Self-etching primer
- Regular primer
- Grease and wax remover
- Painter’s tape
- A steel wool
- A respirator
- A spray gun
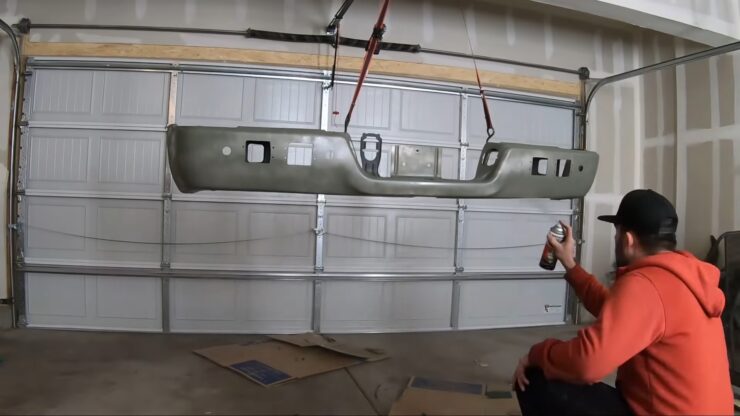
01. Set up your working space
Ensure you choose an area that is wide enough and also well-ventilated.
02. Detach the bumper from your car
The painting project is easily executed when you detach the bumper from your vehicle. To remove the bumper, you need to take out the bolts and screws that connect it to your car.
03. Clean the chrome bumper
Ensure the chrome bumper’s surface is free from dirt, dust, and other unwanted particles. You can mix soap with water and wipe the surface gently and carefully with a clean rag or duster until it is satisfactorily clean.
Afterward, leave the bumper for a few minutes to dry, or make use of a clean-dry duster to wipe off the moisture.
04. Check for rust
Once the surface is dry, the next step is to remove rust particles from the bumper before you attempt to paint it. The most straightforward rust removal technique is to make use of vinegar and baking soda paste or mixture.
Apply this paste on the affected areas, and leave it for about 4-5 minutes. Afterward, rub off the rust particle from the bumper using a wire sponge.
If you are not satisfied with the outcome, repeat the process until the rust particles are entirely loosened. Wash off the residues using soap and water to achieve a clean surface.
05. Remove any imperfections
You need a perfect surface (clean, clear, and smooth). This allows the primer to settle well and allows even coating while applying paint on your chrome bumper.
To achieve this, identify any imperfections on the bumper’s surface and remove them using sandpaper.
06. Apply grease and wax remover on the chrome bumper’s surface
The purpose of this application is to eliminate further traces of grease, dust, oil, or other forms of contaminants on the bumper’s surface.
Apply this solution carefully, and then use a clean rag or duster to wipe it off.

07. Apply tape on the bumper
If you do not want to paint a part or area of the bumper, you can cover this spot using painter’s tape. Ensure the edges are held down firmly and uniformly.
08. Use/wear protective gears
Aerosol spray and fumes from paints are not good for your health. Hence, the need for a respirator. When you wear this safety gear, it prevents you from inhaling these chemicals.
Also, you can wear gloves and eye protection glasses.
09. Apply self-etching primer
Spray the entire bumper’s surface evenly with a self-etching primer up to 3 times. This application allows the regular primer to bond well with the chrome bumper.
After applying the first coating (ensure it is evenly done), allow it to dry before applying the second coating. The same procedure should be followed while applying the last round of coating.
Once the primer has been applied completely and successfully, allow it to settle on the bumper for about 4 hours.

10. Apply regular primer bumper
A regular primer ensures the paint holds/settles well on the chrome, preventing rust and making it stronger. Spray the entire bumper’s surface up to 3 times (ensure the paint is applied evenly).
Allow each coating to dry before subsequent applications. Read the manufacturer’s instructions for the drying time.

11. Sand the primer
Once the primer has settled in well and fully dry, the next step is to sand it using smooth/fine sandpaper. Ensure you do this gently and carefully.
While at it, avoid making contact with the chrome surface. Afterward, use a clean rag or duster to wipe off the particles generated from the sanding exercise.

12. Apply the paint
Apply paint on the chrome bumper (about 4 coats is perfect). For even application, make use of a spray gun. Ensure you know how to operate this tool for the best outcomes.
If you are satisfied with the quality of the job done, leave the coats for a few hours to dry. Then, apply additional paint (about 3 coats).
This supplemental application aims to preserve the color and protect the bumper surface from damages resulting from adverse weather conditions or other destructive elements like chemicals.

13. Screw the bumper back to its position
Now that the supplemental painting is complete and the bumper is dry.
The next thing is to attach or screw it back to its position. Ensure your hand is neat, and be careful with the handling to avoid damaging the paint.
Guide for How to Paint a chrome bumper black
01. Remove the bumper from your vehicle
Disconnect the chrome bumper for an easy painting process or task.
02. Wash the chrome bumper
Get rid of dirt, dust, and other residues from the bumper using soap and water.
03. Use 36-grit sandpaper or sander
Sand the entire chrome bumper to eliminate imperfections such as peeling and cracks.
04. Apply grease and wax remover
Get rid of grease and oil using grease and wax remover. Then wipe off the surface using a dry and clean rug.
05. Apply self-etching primer
(Check the “DYI section” for the process to follow)
06. Apply regular primer
(Check the “DYI section” for the process to follow)
07. Sand the primer
This is done when the primer is completely dry.
08. Apply paint
Ensure the black paint is applied on the chrome bumper surface using a spray gun in light, even coats (4 coats). Ensure each paint application or coating is dry before you apply the next.
Alternatively, you can make use of a spray paint canister. Use the best black chrome paint you can find on the market.

09. Conduct another round of paint applications
Apply about 2-3 coats to strengthen the bumper surface and protect it from extreme conditions.
- Ensure you wash the chrome bumper
- Eliminate or remove rusty particles from the chrome bumper
- Prime the chrome bumper using both self-etching and regular primers before painting
- During paint application, allow each coat to dry before you apply another one
- If you sand through the primer and touch the chrome surface, you must apply the primer again
- Make use of safety and protection gears all through the project
- Don’t touch the chrome bumper surface while sanding the primer
- Don’t be in a rush. Take your time and follow the application steps and instructions for a successful outcome
- Don’t paint the chrome bumper without getting rid of the old/existing paint
- Don’t paint the chrome bumper while it is still attached to the vehicle
FAQs
Can you paint over the chrome?
Yes, you can paint over chrome. Although this process is very straightforward, it is not the best choice considering other available options.
First, you need to understand that the process involved in getting the chrome bumper painted is totally different from your regular painting tasks.
This option should not be considered as a long-term solution. After a short time, even the perfectly executed chrome bumper painting project starts peeling off, making the bumper unattractive.
Replacing your chrome bumper with a steel bumper with a bare steel finish is a better option. You can paint it with your desired color.
How to prep a chrome bumper for paint?
You need to follow some processes to achieve a clean result (an attractive appearance).
As we mentioned earlier, you don’t just fill your spray gun with your choice of paint and start painting the bumper. There are some factors you need to consider and steps to follow before painting.
These steps have been carefully discussed in the DIY GUIDE section. Make sure you go through them carefully.
How to paint a metal bumper?
Before you attempt to paint a metal bumper, you must ensure the surface is free from rust, grease, dirt, and old paint. Once the surface is satisfactorily clean, apply mineral spirits on the bumper and wipe it off gently using a clean duster.
Afterward, apply regular primer and paint the metal surface as instructed by the manufacturer.
How long does it take to paint a chrome bumper?
Getting your chrome bumper painted takes about 10 hours on average. In some cases, it may last for a day or more. Much time is spent ensuring the bumper surface is in perfect condition before the paint is finally applied, together with the drying time.
Once the painting task has been completed, you can leave your vehicle for a few hours before you finally take it out on a drive. This gives the paint enough time to dry, preventing it from attracting dust and dirt quickly.
How often can I paint a chrome bumper?
There are no limits or restrictions to the number of times you can paint your chrome bumper. Most importantly, you must prep and sand the bumper surface properly before every painting project.
You must take off the existing or old paint, eliminate rust particles, and apply other necessary solutions on the surface for the best outcomes.
When should a bumper be replaced?
When there is a major crack on this part of your vehicle, you may consider a replacement.
However, you can correct most bumper issues through repair instead of completely changing this part of your vehicle.
For instance, a dented bumper doesn’t necessarily have to be replaced.
This issue can be corrected or fixed through repair.
What type of paint should I use to paint my chrome bumper?
You should use paint that is specifically formulated for use on automotive surfaces.
This type of paint is designed to adhere well to metal surfaces and withstand exposure to the elements.
Look for paint that is labeled as “automotive paint” or “high-performance enamel.”
How long will it take to paint a chrome bumper?
The length of time it takes to paint a chrome bumper will depend on several factors, including the size of the bumper, the number of coats of paint required, and the drying time for each coat.
In general, you should allow at least a day or two for the entire process, including cleaning, sanding, priming, painting, and clear coating.
Can I paint a chrome bumper myself or should I have it professionally painted?
It is possible to paint a chrome bumper yourself, but it requires some skill and experience with painting automotive surfaces.
If you are not confident in your abilities or do not have the necessary equipment and supplies, it is recommended that you have the bumper professionally painted by a qualified auto body shop.
A professional paint job will ensure a high-quality finish and protect the bumper from damage.
Verdict
We have discussed how to paint chrome bumpers for improved appearance and best outcomes. Ensure you prep the chrome bumper thoroughly, following the tips/steps discussed in this guide.
When you paint your chrome bumper, it gives your vehicle a fresh look and enhances its aesthetic value.
While chrome bumper painting may not hold up to or withstand the pressure and extreme conditions of everyday use over an extended period, it provides an easy and affordable means of ensuring the bumper remains in excellent condition.
Suppose you can’t afford to replace your chrome bumper with either steel or metal designs. Ensure you repaint the chrome bumper surface from time to time.
For every painting task, you must remove the old paint, eliminate rust particles, and apply the paint according to the manufacturer’s recommendations.